
Vigor Model- 2912 Ver- 3.8.1.1
Cyeberoam Model- CR25iNG – 10.6.3 MR-4
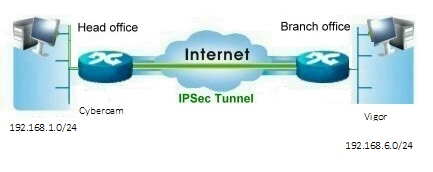
This article describes a detailed configuration example that demonstrates how to set up a LAN-to-LAN IPSec VPN connection between Cyberoam and Vigor using preshared key to authenticate VPN peers.
Throughout the article we will use the network parameters as shown in the diagram below

Step by Step Configuration on Cyberoam
Step 1: Create VPN Policy
- Go to VPN and create VPN Policy with following values:
- Policy Name: Vigor2912
- Description: If required
- Allow Re-keying: Yes
- Key Negotiation Tries: 3
- Authentication Mode: Main Mode
- Pass data in compressed format: Enable
Phase 1
- Encryption Algorithm: AES256: Authentication Algorithm MD5
- Encryption Algorithm: AES256: Authentication Algorithm SHA 1
- DH Group (Key Group): 2 (DH1024)
- Key life: 28800 sec
- Rekey margin: 120 Sec
- Randomize Rekeying margin by: 0
- Dead Peer Detection: Enable
- Check Peer After Every: 10 Sec
- Wait for response upto: 30 Sec
- Action When Peer unreachable : Disconnect
Phase 2
- Encryption Algorithm: AES256 Authentication Algorithm: MD5
- Encryption Algorithm: AES256 Authentication Algorithm: SHA1
- PFS Group (DH Group): None
- Key life: 3600 sec

Step 2: Create VPN Connection
- Go to VPN IPSec Connection Create Connection and specify parameters as follows:
- Connection name: Vigor2912
- Description: If required
- Connection Type: Site to Site
- Policy: Choose Vigor 2912 policy
- Action on restart: Respond only
- Authentication Type – Preshared Key
- Preshared Key: 0123456789
- End points Details Local (WAN IP address) – 2.50.6.141
- Remote : xxxx.dyndns.org
- Local: choose Cyberoam Local Subnet from the Object : 192.168.1.0/24
- Remote: Choose Vigor Local Subnet from the Object : 192.168.6.0/24


Step 3 Go to VPN and Remote Access >> Remote Access Control Setup
- To allow the VPN traffic through routers, enable IPsec services as per following screen

Step 4 Go to VPN and Remote Access LAN to LAN
- Choose an unused profile, e.g. 1. and click Next to continue.
- The status of unused profile will be “???”
Section 1: Common Settings
- Enter a Profile Name and enable the profile
- As Vigor router will always initiate the VPN connection, for Call Direction click “Dial-Out” and click “Always on” to enable always on VPN tunnel.
Section 2: Dial- Out Settings
- Under Type of Server I am calling, select “IPSec Tunnel” and enter WAN IP address/hostname of Cyberoam i.e. 2.50.6.141 as Server IP/Host Name
- Under IKE Authentication Method, click “Pre-Shared Key” and enter Pre-Shared Key 0123456789
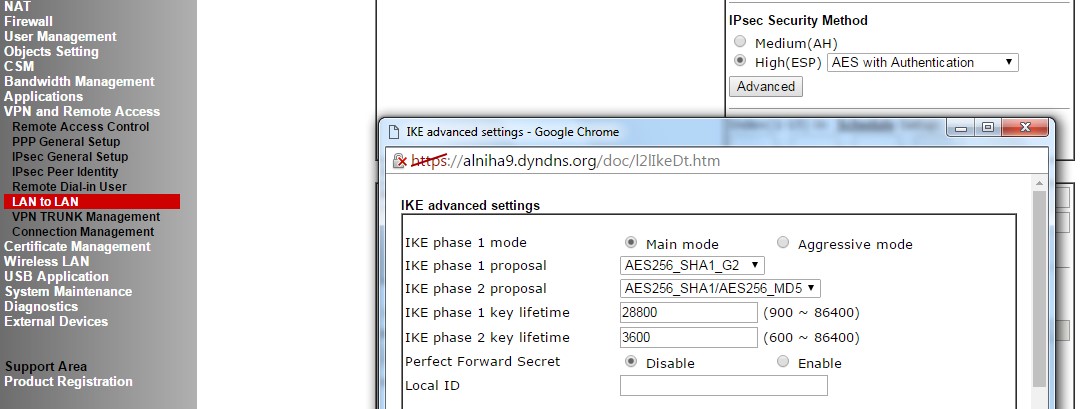
- Under IPSec Security Method, click “High (ESP)” and select AES with Authentication
- Click “Advanced” button
In Advanced settings enter parameters as follows:
- IKE phase 1 mode: Main mode
- IKE phase 1 proposal: AES256_SHA1_G2
- IKE phase 2 proposal: AES256_SHA1/AES256_MD5
- IKE phase 1 key lifetime: 28800
- IKE phase 2 key lifetime: 3600
- Perfect Forward Secret: Disable

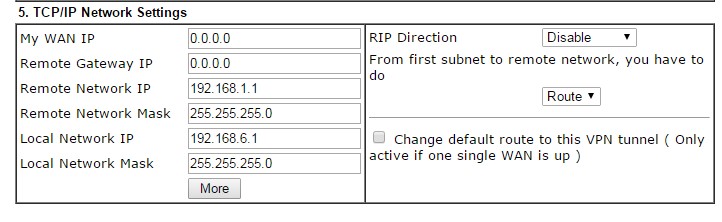
Section 5: TCP/ IP Network Settings
- Enter following parameters
- Remote Network IP – 192.168.1.1 (Cyberoam’s internal network IP)
- Remote Network Mask – 255.255.255.0
- Local Network IP- 192.168.6.1 (Vigor Internal network IP)
- Local Network Mask- 255.255.255.0
- Click “OK” button
After above configurations see the VPN status below.


